Microsoft Outlook
From Luke Jackson
| Revision as of 16:45, 13 March 2007 (edit) Ljackson (Talk | contribs) (→Summary) ← Previous diff |
Revision as of 16:46, 13 March 2007 (edit) Ljackson (Talk | contribs) (→Summary) Next diff → |
||
| Line 1: | Line 1: | ||
| == Create New eMail Account == | == Create New eMail Account == | ||
| - | == Summary == | + | === Summary === |
| [[Image:Ms outlook startup.jpg|thumb|300px|Imagery for Summary]] | [[Image:Ms outlook startup.jpg|thumb|300px|Imagery for Summary]] | ||
Revision as of 16:46, 13 March 2007
Contents |
Create New eMail Account
Summary
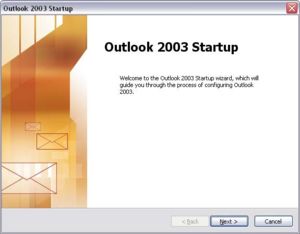
If this is a new installation of Microsoft Outlook on first launch you will be asked if you would like to setup a Mail Account. (As pictured on the left) Otherwise you will need to access the E-Mail Accounts Wizard by selecting the Tools sub-menu from the menu bar and choosing E-mail Accounts...
Step 1
Choose Yes what asked if you would like to setup a E-Mail account now and then click OK to proceed .
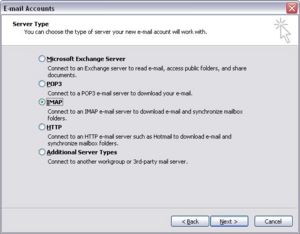
Step 2
- POP3
If you are not always connected to the internet and would like to store you eMail messsages on your local machine choose POP3 on this screen.
- IMAP
If you are always connected to the internet and would rather store your eMail messages on the remote server choose IMAP on this screen.
- Microsoft Exchange
If you are using an Exchange server and are a member of a domain choose Microsoft Exchange on this scree.
Step 4: Complete all of the requested information exactly as shown above.
E-mail Address: email@domain.ext
Mail Servers: mail.luteck.com
User Name: username@domain.ext - This can be different from your email address if you are using an alias.
Password: yourpassword - Example (ilovelinux)
Click on More Settings... to continue with Step 5.
Step 5: After you clicked on More Settings... it should have launched the window above.
If you would like you can change the name of the mail account by simply typing your desired name in the Mail Account box as shown above. This is not necessary but it helps organize your accounts if you have more than one. - (By default your account takes the name of the mail server)
Step 6: It is required that you authenticate with our servers prior to sending messages to users not on our systems.
To enable this simply check My outgoing server (SMTP) requires authentication
Now Outlook will pass the same Username and Password you provided earlier and allow messages to be sent externally.
Click OK to apply these settings and be returned to the main E-mail Accounts window.
Step 7
Once at the E-mail Accounts window simply click next to complete the wizard and activate your new email account. Lastly click finish and you will be returned to Outlook.
Permanently Delete IMAP eMails
When using IMAP your eMails are stored on the SMTP server rather than on your local disk. Because of this you when you delete a message, it still displays the message but puts a line through it. It will remain on the server until they are “purged,” taking up space and viewable in other clients (such as webmail).
To permanently remove your deleted emails, choose Edit > Purge Deleted Messages.
To add the Purge Deleted Messages button to your Outlook toolbar
- Choose View | Toolbars > Customize…
- Choose the Commands tab and click on the Edit Category.
- Scroll down the commands list and select Purge Deleted Messages.
Export eMail Account Data
All of the account data is stored in the registry. To export this data simple export to file the following registry key.
HKEY_CURRENT_USER\Software\Microsoft\Windows NT\CurrentVersion\Windows Messaging Subsystem\Profiles\Outlook
To import these account settings on a new machine simple merge the registry file with the active registry and relaunch Outlook.
Note: It may be necessary to restart Outlook once again in order for it to update internal linking correctly.
Export eMail Data
All of the eMail data for Outlook is stored in two folders under your profile:
\Documents and Settings\<username>\Application Data\Microsoft\Outlook
and
\Documents and Settings\<username>\Local Settings\Application Data\Microsoft\Outlook
To import this data into a new Outlook installation simply launch Outlook after a fresh install and DO NO configure an email address BUT finish the wizard. It will go through created a .dat file and generating a welcome message. Once this is completed exit out look.
Browse to the folder paths listed above and remove and files that were created by Outlook. Now copy your original files into these folders and relaunch outlook. If you are alerted that your .dat file can not be found simply click ok and it will allow you to browse and locate it.
Note: You can also use this method to change the location of your .dat file.
Note: It may be necessary to restart Outlook in order for it to update internal linking correctly.

