Secure Copy (SCP)
From Luke Jackson
| Revision as of 04:30, 3 May 2007 (edit) Ljackson (Talk | contribs) (→See Also) ← Previous diff |
Revision as of 03:47, 30 December 2010 (edit) Ljackson (Talk | contribs) (→Escaping Spaces) Next diff → |
||
| Line 127: | Line 127: | ||
| scp user@server.ext:'/home/samba/Service\ Deliver/System\ Admin/file\ name.sxw' . | scp user@server.ext:'/home/samba/Service\ Deliver/System\ Admin/file\ name.sxw' . | ||
| + | |||
| + | scp user@host:"'filename with spaces'" destination | ||
| == Public Key Authentication == | == Public Key Authentication == | ||
Revision as of 03:47, 30 December 2010
Contents |
Summary
Secure Copy is the quickest, most effect way to transfer data from one machine to another. It's speeds surpass that of SFTP by far, but still are encyrpted with a rock solid algorithm. It may seem a little tricky at first, but it can prove to be quite useful, especially if you can utilize bash scripting.
Requirements
Linux
Secure Copy comes standard and can be executed by the command below:
scp
Mac OS X
Secure Copy comes standard and can be executed by the command below:
scp
Mac OS X (GUI)
There is no built-in Graphical User Interface (GUI) client for scp on Mac OS X.
Requirements
- Mac OS X
- Fugu GUI SCP Client - Download
Install Fugu
Installing .DMG Applications on Mac OS X is very simple. Simply drag the icon from the .DMG image window into your Applications folder and you are done.
Connecting
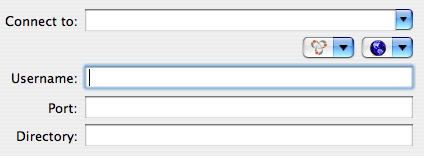
Once you have installed Fugu simply enter the information into the fields provided.
- Connect: Server Address
- User Name: Login ID
- Port: SCP port number (Default port 22)
- Directory: Starting directory (Optional)
After you click connect Fugu will attempt to authenticate with the server based on the servers installed mechanisms. This simply means that if you are not using Public Key Authentication it will fall back to password authentication and prompt you for your password.
Windows XP
While not native to Windows, there is a Windows program that acts the same called pscp, which is created by the same people who distribute PuTTY - "www.putty.nl".
To install on Windows, download and save pscp.exe to C:\WINDOWS\. This way you can type pscp in any folder and still have access to it. If you are using pscp, please remember throughout this guide to replace scp with pscp!
Some drawbacks to the windows version of pscp:
- Does not support files over 2GB. It doesn't tell you, either, it just corrupts the file.
- Does not transfer as quickly as scp.
- Does not support spaces of any type in file names (quotations won't save you this time!)
Windows XP (GUI)
There is no built-in Graphical User Interface (GUI) client for scp on Windows XP.
Requirements
- Windows XP
- WinSCP Client - Download
Install WinSCP
Once the executable is finished downloading simple follow the dialog boxes to install the software on your computer.
Connecting
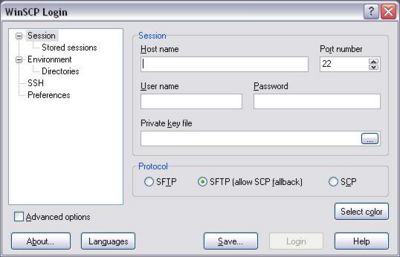
Once you have installed WinSCP simply enter the information into the fields provided.
- Host name: Server Address
- Port: SCP port number (Default port 22)
- User Name: Login ID
- Password: Password
- Private key file: Path to your private key (Optional)
- SFTP, SFTP (SCP Fallback), SCP
Once you click Login WinSCP will authenticate with the server and bring up an window displaying the current files on the server.
Examples
Uploading
To put a file in your home directory on the server:
scp local_file.txt user@server.com:
To send a file to a specific directory:
scp local_file.txt user@server.com:/directory/to/folder/you/want/it/to/go/
To put the file on the server in a subfolder of your home dir named "downloads", the command would be:
scp local_file.txt user@server.com:downloads/
Notice the difference between the last two. When going to a folder that does not reside within your home dir, you must start with the root directory and give a full path. When you are adding stuff to your home folder, you do NOT start with a root directory! (Root directory is the forward slash to the very left of the path.)
(The following tip does not work from pscp, ONLY scp): If your local username is the same as the remove username, you can omit your login name from the command. For instance, if your local login is jwatt and your remove login is jwatt, you can take this command:
scp local_file.mp3 jwatt@gtwy.net:music/
and simplify it, turning it into:
scp local_file.mp3 gtwy.net:music/
This doesn't work on Windows because local Windows users are different than linux users.
To upload a directory to a webserver, you use the recursive switch -r:
scp -r local_folder/ user@server.com:/path/to/wherever/
After uploading, the folder location will be:
/path/to/wherever/local_folder/
Downloading
To download the file "serials.txt" from your remote home dir to the local computer:
scp user@server.com:serials.txt .
To download the remote file "something" using it's full path to your local computer:
scp user@server.com:/path/to/file/something.txt .
Now the tricky part: using the recursive switch (-r) to download a whole folder to your local computer. The issue you may have is that you DO NOT place a trailing forward slash after the directory name. For instance, this command will NOT work (notice the bold forward slash):
scp -r user@server.com:/path/to/directory/ .
This will give you a message saying the server is trying to write to the parent directory. REMOVE the last foward slash on the path and try again. The next command is CORRECT:
scp -r user@server.com:/path/to/directory .
I have been using a period when talking about downloading so far. Reason: this brings the file into the directory you are currently in. If you wish to take the last command and download it to somewhere else, the command would be:
scp -r user@server.com:/path/to/directory /new/local/location/
Escaping Spaces
Below is an example of how to work with spaces in directory structure:
scp user@server.ext:'/home/samba/Service\ Deliver/System\ Admin/file\ name.sxw' .
scp user@host:"'filename with spaces'" destination
Public Key Authentication
If you have many different servers that you have to connect to on a daily basis it may be more effective for you to use Public Key Authentication. With this feature enabled you are able to securely authenticate to servers with out typing in a password. Unfortunately in order to use it you will have to configure you server and client to support it.
See Also
- Public Key Authentication - Use SCP without having to deal with passwords.

